Are you looking to jailbreak your Nintendo Switch? If you do, then you’re in the right place.
Nintendo Switch is the best 2-in-1 console out there. It can run exclusive Nintendo games or third-party games that swarmed the console just after it was released.
However, what if you want to homebrew your console? Can you do it? Well, you can!
Jailbreaking Nintendo Switch is possible. But, it is not as easy as it requires the owner to take risks. If you’re conservative, then using Nintendo Switch without any modification is the best way.
However, if you’re here, then you have most probably made up your mind to jailbreak Switch.
All you need to do is follow the steps mentioned in the tutorial, and you’re good to go. Throughout the process, you’ll need to be patient.
Let’s get started.
Disclaimer: Before you proceed, you must know the legal implications of jailbreaking a console (seek local laws for better clarity). Nintendo’s T&C dictates that you cannot modify the consoles beyond the intended functionality. We condemn any form of piracy, both intended and unintended. The tutorial is for educational purposes only.
What is Jailbreaking a Switch?
Nintendo is known for its anti-piracy measures. And, if you’re going to jailbreak, you’ll need to ensure the risks that come with it.
Before, we do share the risks. Let’s learn what Jailbreaking is.
Jailbreaking is a technical term where you unlock capabilities or restrictions the manufacturer sets. The jailbreaking process requires exploiting a system flaw, giving you complete control over the device. You may have heard it mainly in the case of “iPhone.” Jailbreaking is also known as “hacking,” “modding,” or “homebrewing” the device.
Nintendo Switch, similar to iPhones, can also be jailbroken. When you homebrew your Switch, you get complete control over your device. This way, you can install third-party or unofficial Switch games and apps.
Reasons for Jailbreaking Nintendo Switch
Despite these risks, many people mod their Switch. So, is it worth the risks? Let’s find out the reasons why you should jailbreak your Nintendo Switch.
➡️ Run Homebrew Applications
Homebrew opens up a lot of possibilities. It means you can play modded games with better controls and resolution support. Furthermore, you can also install fan-made content.
➡️ Emulators
Do you want to try old games on your Nintendo Switch? If you do, then modded Switch lets you do so. The Switch hardware can run the emulators, giving you the ability to feel nostalgic. You can run emulators to try retro NES, SNES, and N64 games. Right now, Nintendo offers access to retro games through its subscription model. However, with emulation, you don’t have to pay anything to play these games. You can try RetroArch to play retro games. If you’re a fan of PSP games, then you can load PPSSPP on Switch.
➡️ Custom Themes
Nintendo’s operating system is simple and effective. However, it doesn’t give you many options when using themes that change your console’s outlook. A modded Switch lets you try out custom themes that can completely change the look and feel of your console. For example, you can install the Stranger Things theme to make it feel spooky and dark!
➡️ Android
If you’ve got a hold of modding Switch, you can go one step further and install Android. Yes, you read it right! Installing Android opens up many possibilities, including playing Android games, watching Youtube, or browsing the web.
➡️ Run Backed-up Switch Games
Game preservation is a hot topic in game communities. Games get old, servers disappear, and you lose access to your favorite games. By modding your Switch, you can preserve your legally owned games. Nintendo is known for shutting down services and preventing access to legally old games. For instance, Nintendo recently turned off access to their Wii U and 3DS stores.
How to Jailbreak Nintendo Switch
Jailbreaking Nintendo Switch requires carefully following each step. If you miss one, you’ll find yourself stuck. In that case, start over and ensure you don’t miss any steps mentioned here.
Before we go and list all the necessary steps, let’s learn about the hackability of Nintendo Switch different generations and models.
Is your Nintendo Switch Moddable?
Before you start modding your Switch, you must know whether it is possible to jailbreak or not. And what approach should you take?
The good news is that “all” variations of Nintendo Switch can be modded. You can have Nintendo Switch V1(version 1), V2, OLED, and Switch Lite. However, only Nintendo Switch V1 can be soft-modded out of all these. If you have a Nintendo Switch other than the V1, you must hard-mod it, which requires an external chip soldered into the Nintendo main motherboard.
We’ll not cover how you can hard-mod your Nintendo Switch. The internet is free, and there are plenty of resources out there that can tell you the story. However, before you proceed, it is always a good idea to know that hard modding should be avoided by yourself. The best approach is to find someone locally and ask them to mod your Switch. For that, you’ll need to buy HWFLY or PicoFLY. You can try to search for them on a local marketplace or Amazon.
Once hard-modded, you can return and follow the steps below.
Pre-requisite to Get Started
To follow the guide, you must have access to the following:
- You need a working moddable Nintendo Switch V1 unpatched unit or a hard-modded Switch. If unsure, check Is My Switch Patched by putting your Switch’s serial number. That’s because even some units of V1 cannot be soft-modded. If your Switch is not patched, you can soft-mod. Otherwise, the hard mod is the way to go.
- An RCM jig or payload injector (optional).
- A laptop or computer with a USB-A to USB-C cable.
- A microSD-card adaptor.
- A microSD card (32 GB will work, but its best to have 64 GB or more)
Note: Before you proceed, make sure to back up your data, both on the Nintendo Switch’s internal storage and microSD card.
What is an RCM Jig?
RCM jig is a small plastic item with two-metal connectors that helps you to enter RCM (ReCovery Mode) on your Nintendo Switch. If you don’t have an RCM jig, you can use a paper clip to enter RCM on Switch (Google how to do it). However, it is best to have an RCM jig for ease of use.

Software That You’ll Need to Download
Apart from these, you’ll also need other software/files. Let’s go through them below.
- Atmosphere: Atmosphere is the most popular custom firmware for Nintendo Switch. It is a complex solution, but you don’t need to learn how it works internally. It is licensed under GPLv2, making it accessible for anyone to use. Go to its latest release page and download the following:
- atmosphere-X.X.X.zip (X.X.X is the version name).
- fusee.bin
- Hekate: A bootloader interface for Nintendo Switch. It supports all custom firmware and payload. Go to its release page and download hekate_ctcaer_X.X.X_Nyx_X.X.XvX.zip file only. Here, X stands for numbers that denote its version.
- Sigpatches: For installing games on your Nintendo Switch, you’ll also need sigpatches. We won’t link it, but you can use Google to search for it.
- TegraRCMGUI: It’s a GUI-based bootloader that lets you inject payloads so that your Switch boots into RCM mode. You can also use it to load Hekate or Atmosphere. Like other tools, go to its release page and download TegraRCMGUI_vX.X_installer.msi or TegraRCMGUI_X.X_portable.zip.
Download all of the above tools/software to your desktop. Now, we move on to the steps for jailbreaking your Nintendo Switch.
➡️ Step 1: Setting Up Your Nintendo Switch
The first step is to set up your Nintendo Switch. Here, you can do two things. You can either update to the latest firmware (make sure it is supported by Atmosphere by reading its patch notes) or leave it as it is.
You can back up your games and save data with a Nintendo Switch Online subscription.
Turn it off by holding the Power button and pressing Power Off. Once it is turned off, remove the microSD card from your Nintendo Switch.

➡️ Step 2: Preparing microSD Card
In this step, we’ll prepare our microSD card.
Insert the microSD card into your SD card reader. Once it is readable on your computer/laptop, format it to FAT 32.
Once formatted, you’ll now need to put all files in it. Make sure you follow the steps correctly.
- Open up the atmosphere-X.X.X.zip file and copy its content to the root of the microSD card.
- Next, open up hekate_ctcaer_X.X.X_Nyx_X.X.XvX.zip file and drag-and-drop its content to microSD root content. You also need to copy the hekate_ctcaer_X.X.X.bin file to your desktop, as we’ll use it to boot out the console to RCM mode.
- Open up the signature patches zip file and copy its content to the root of the microSD card.
- Go back to microSD card root > bootloader > payloads. Once there, copy-paste the fusee.bin file to it.
The microSD card is now prepared. Take it out and insert it into the Nintendo Switch.
➡️ Step 3: Booting into the Recovery Mode (RCM)
With the microSD card inserted, it is time to boot our Nintendo Switch in RCM mode. To do so, we’ll need the RCM jig.
Note: If you don’t have an RCM jig, you can use the tinfoil method to put the Switch in Recovery Mode.
- The first step is to take out the right Joy-Con. Now, put the RCM jig on the rails of the Nintendo Switch with pins facing down.

- Once the jig is in place, press the power and volume up button for 2-3 seconds. The screen should stay as it is — i.e., no power-up or changes.
- Remove the RCM jig, put your right Joy-Con back into its slot, and connect the Switch to your computer using a USB cable.
- Open up the TegraRCMGUI on your computer. I have the portable version installed. If you’re opening it for the first time, it’ll ask you to install the required driver. If it doesn’t ask, go to Settings and click “Install Drivers.”
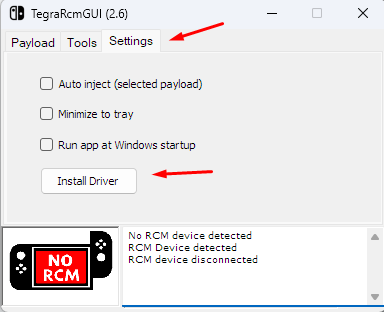
- As soon as you install the drivers, the RCM status will change to “RCM OK.”
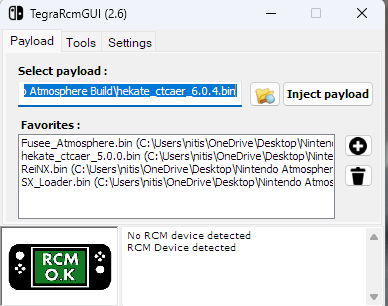
- Next, click the small browse button beside “Inject payload” and select the hekate_ctcaer_X.X.X.bin file you saved on your desktop.
- Click Inject Payload.
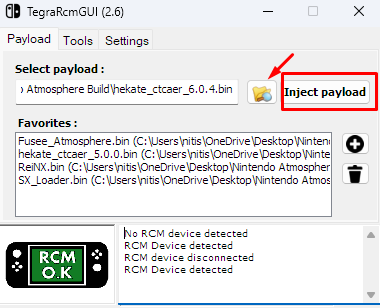
The Nintendo Switch should boot into the Hekate bootloader. If it doesn’t, retry and ensure your Switch is in RCM mode before pushing the payload.
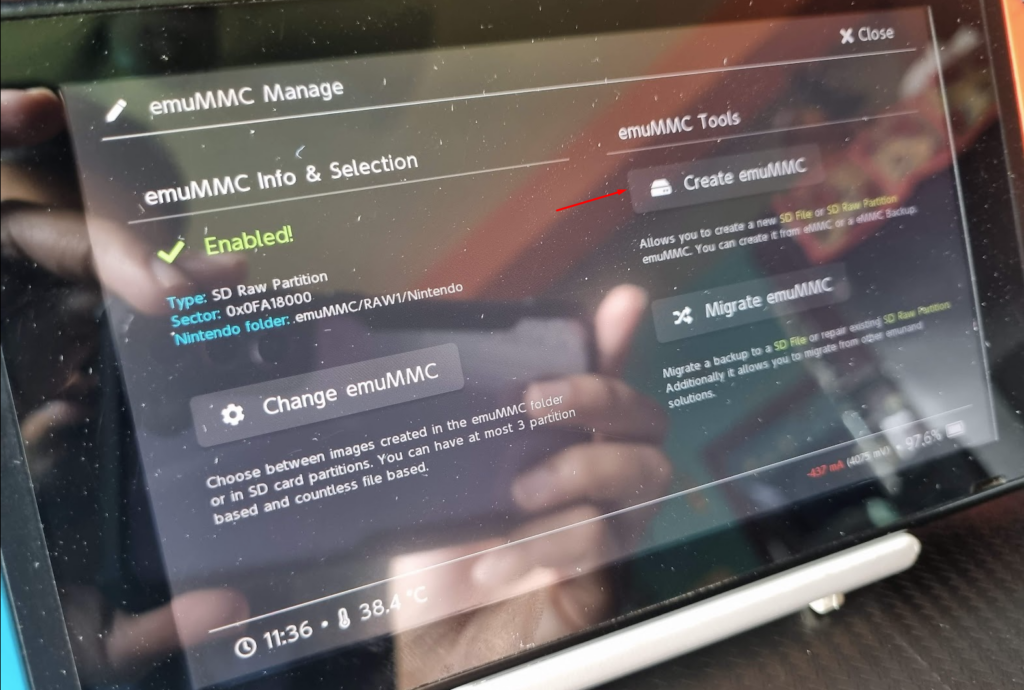
➡️ Step 4: Creating an emuMMC Partition to Install Custom Firmware
In this step, we’ll learn how to create an emuMMC partition. In this process, we’ll copy our internal NAND storage to microSD, enabling us to install the custom firmware. This’ll also ensure that we leave the internal NAND storage untouched, which can be useful when returning to the original Switch settings.
To create emuMMC, follow the steps below:
- Select the emuMMC option.
- Now, create the emuMMC option under emuMMC tools.
- Click on the SD Partition option.
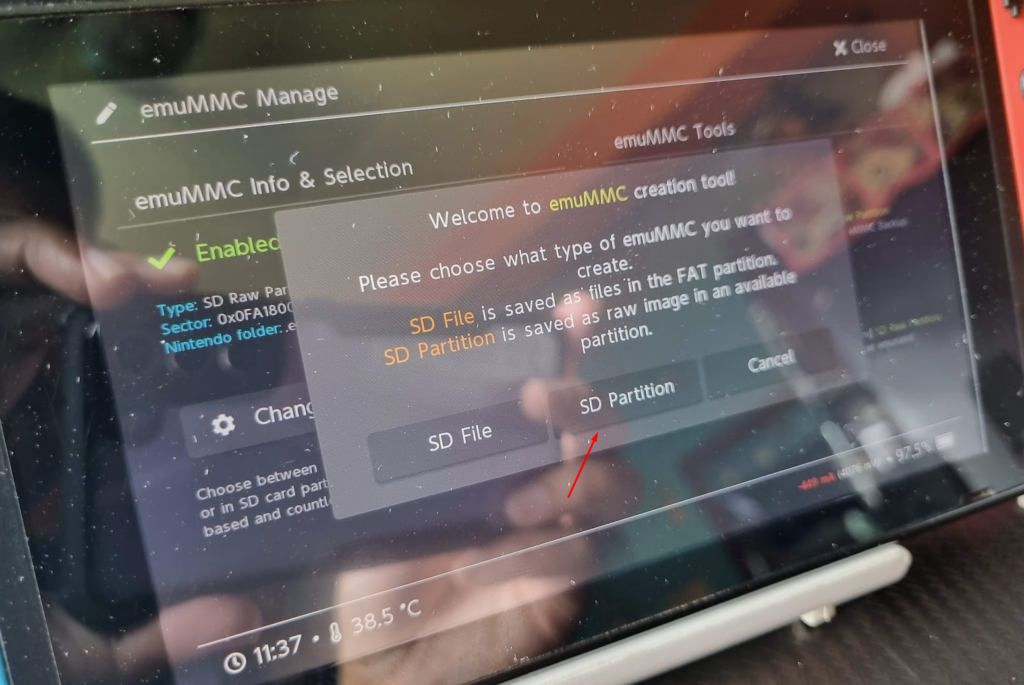
- Now, it’ll show you a message “Failed to find applicable partition.”
- Click Continue and then OK.
- Now, it’ll open the Partition Manager. Just drag the emuMMC(RAW) to the extreme right and click “Next Step”.
- Click Start to initiate the partition of the microSD card.
The process will take some time to back up the files and create the partitions that will be useful when installing the custom firmware. Click Ok after its completion. Next, close the window, and go back to emuMMC manage.
Again, click on create emuMMC option > select “SD partition” > “Part 1.”
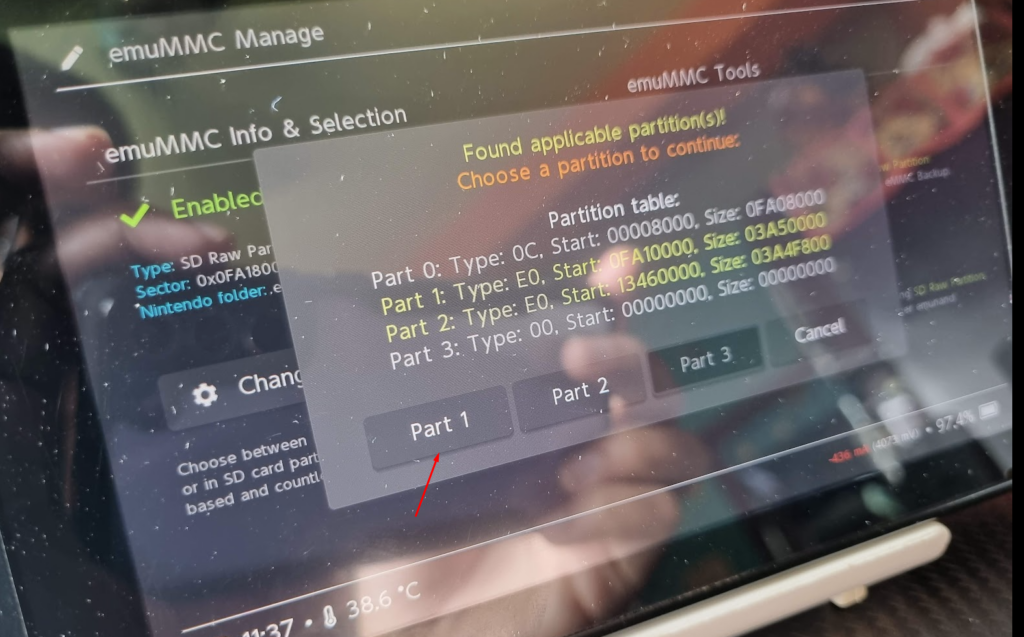
This will copy all the internal NAND storage to the microSD card. It’ll take a few minutes to an hour, depending on the microSD card speed.
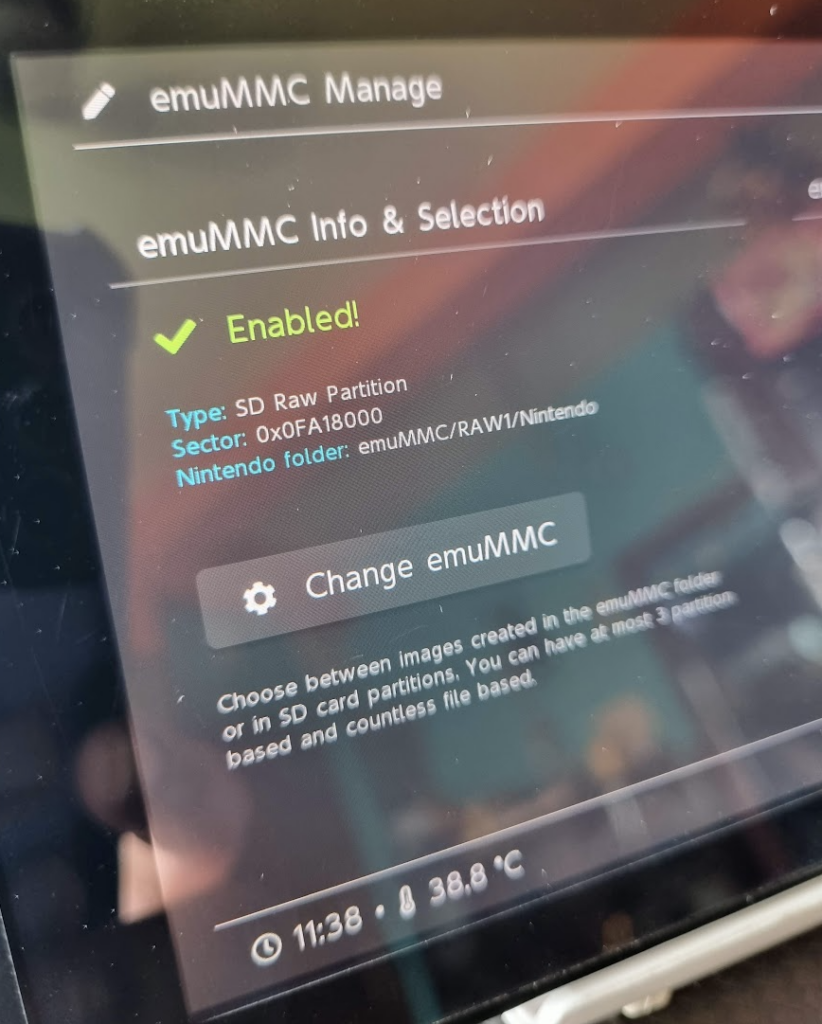
Once completed, close the menu, and you’ll see that emuMMC is now enabled.
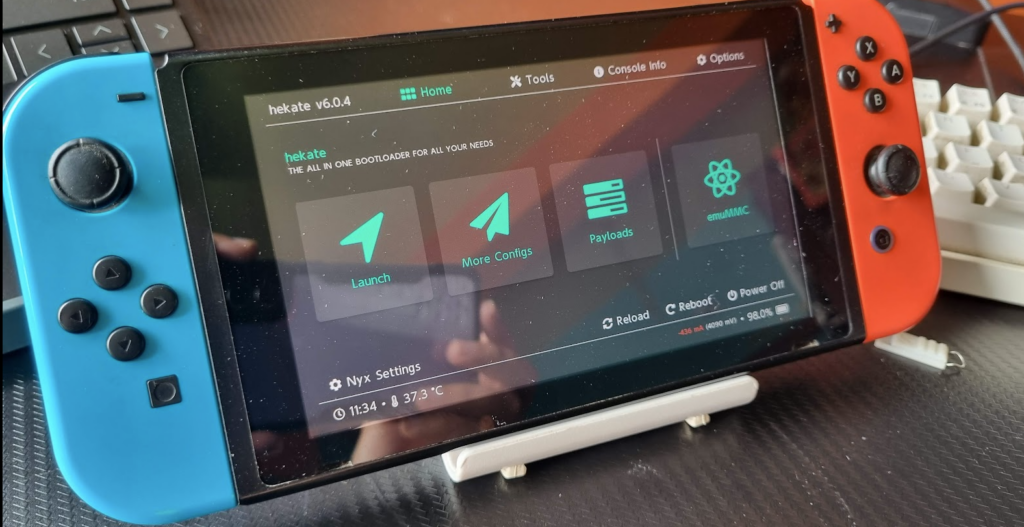
➡️ Step 5: Load the Hekate Payload and Boot into Atmosphere
Next, you’ll need to load the payloads.
Go to the Hekate main menu and click on Payloads.
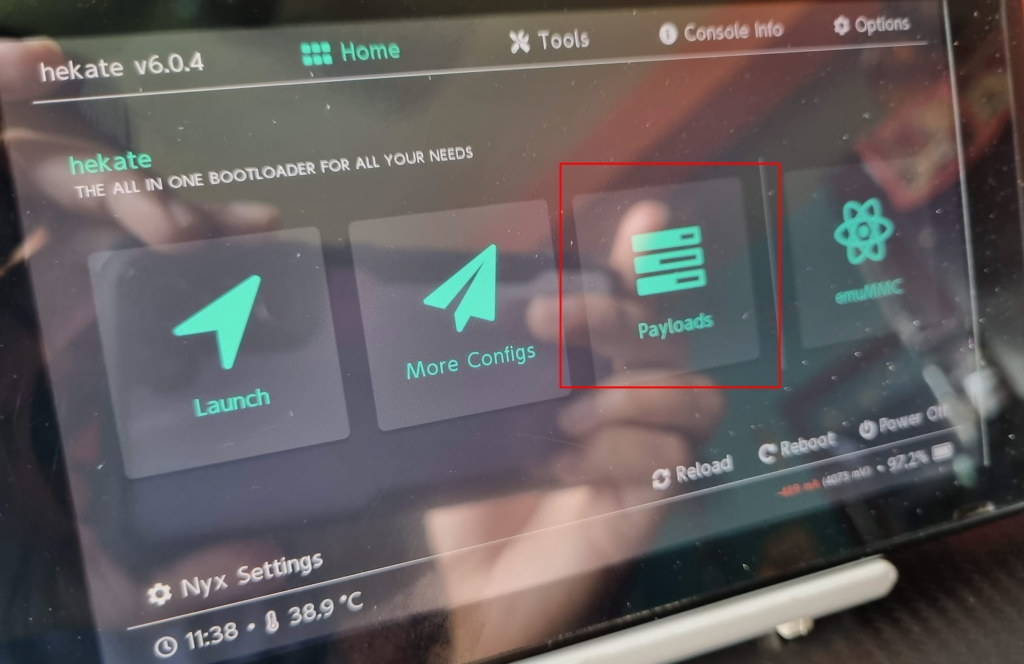
And then, choose the “fusee.bin” file.
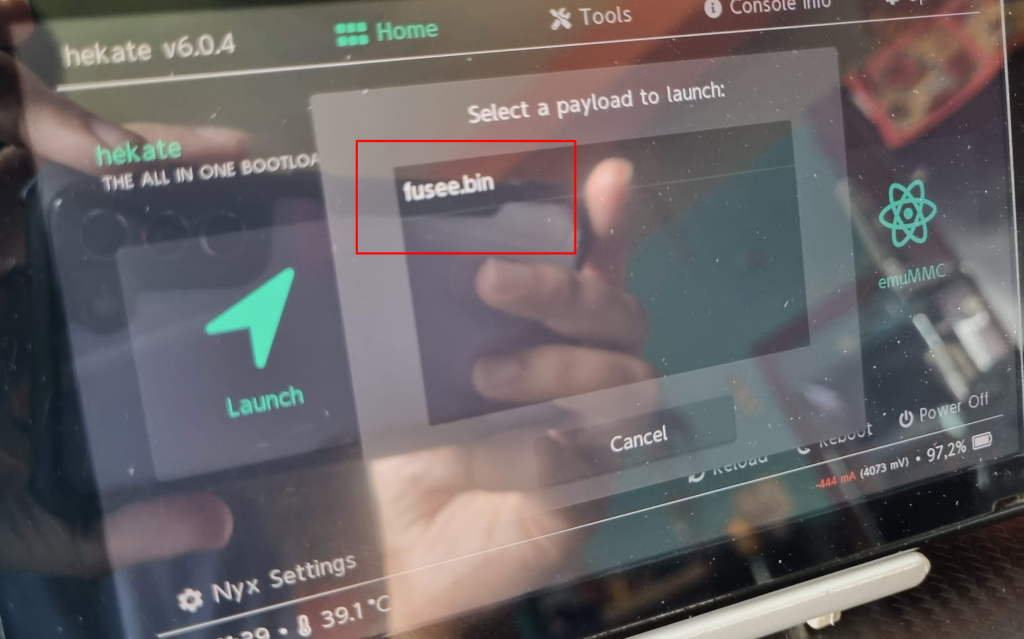
Note: If you get an error, it is best to rebuild your microSD card. Sometimes during formatting, files get erased. Once you rebuild your microSD card with all the necessary files, you can continue from this point (no need to do the earlier steps again).
When you select it, the Switch will start loading Atmosphere custom firmware using the emuMMC partition in the microSD card.
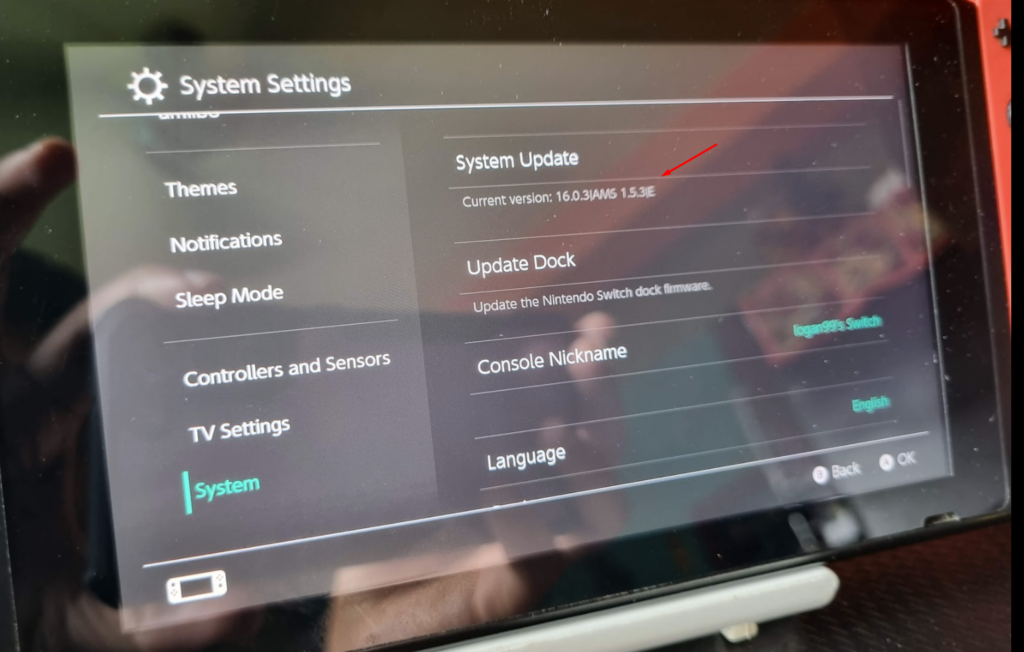
That’s it; you jailbroke your Switch.
Go to System Settings > Systems and check the current version to see the emuMMC at work.
➡️ Step 6: Block Nintendo Servers using DNS Settings
In the last step, you should block Nintendo servers using DNS settings. Check out 90DNS.
Also, you can put your Switch to Airplane mode to stop any communications. This will keep your Switch safe from getting flagged and eventually banned from Nintendo Online Services.
And that leads us to the risks associated with modding your Nintendo Switch.
Risks of Jailbreaking Nintendo Switch 🚫
Nintendo spent millions of dollars prototyping, developing, and releasing the Switch console. They have to work on the hardware and the supporting operating system. Ultimately, you get a user-friendly console that requires no technical skills.
However, user-friendliness is complex code that runs tightly-packed hardware.
➡️ Bricking the Device
So, when you start fiddling with the package, your biggest risk is bricking the device. As you’re fiddling with the Switch firmware or making system-level changes to the software, you can quickly get your Switch bricked with one mistake. Once your device gets bricked, it is no longer usable and is an expensive paperweight.
➡️ Voided Warranty
In addition, Nintendo clearly states that it is against their Terms and Conditions to jailbreak their device. If you do, you’ll void the warranty; hence, your device won’t get replaced if it gets bricked (only if they find that you have bricked it). Nintendo doesn’t have any system in place to know for now. However, if they find that the hardware is tampered with, then they can deny your warranty.
➡️ Risk of Getting Your Nintendo Switch Banned
And, if you successfully mod your Switch, you risk getting your Nintendo Switch and account banned. Nintendo’s online servers can detect if you have modified the hardware or the software as it is against their Terms of Service.
Once your account is banned, you cannot access any online services, including legally bought digital purchases. You can create a new account, but that means starting from scratch.
If it is a hardware-level ban, creating new accounts or restoring the Switch’s original firmware will not unlock anything.
➡️ Less Stable Experience and Security Vulnerability
Lastly, homebrewing Switch means opening yourself up to a less stable experience. This means you may encounter glitches or bugs when playing. Your Switch can crash, or you can see an increased battery consumption. Once jailbroken, your Nintendo Switch won’t receive the newest firmware or software updates, making it vulnerable to security exploits.
In short, the risks of jailbreaking your Switch include the following:
- Losing official warranty.
- Bricking your device.
- Nintendo account getting banned.
- Hardware ban.
- Instability due to lack of patches.
- More vulnerable to security issues.
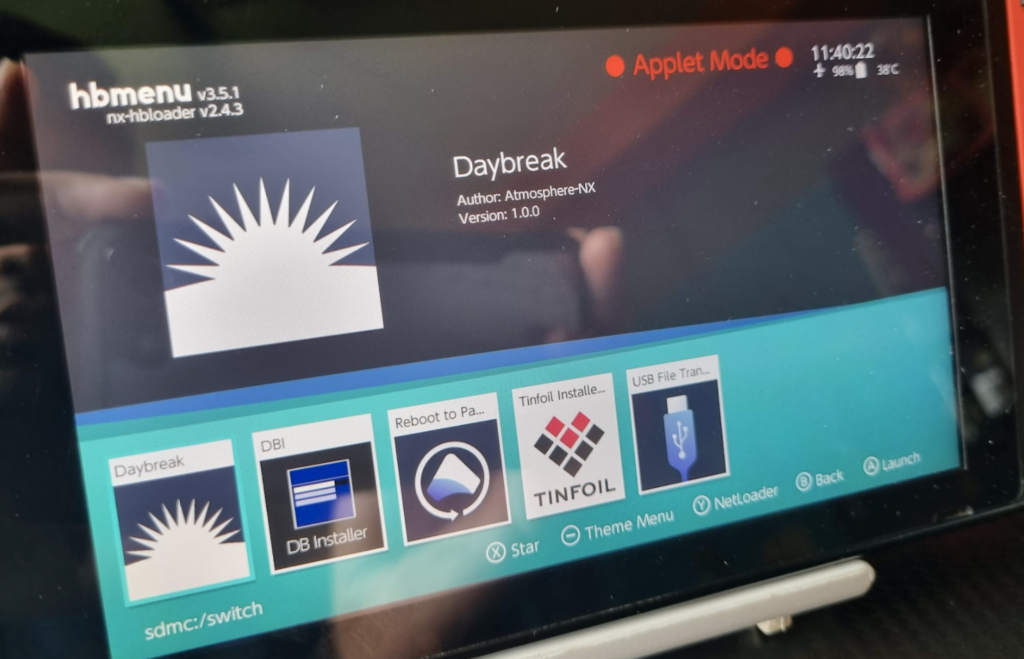
Installing Homebrew Games
There’re tons of Homebrew apps and games out there on Switch.
To go to the Homebrew menu, double tap the Album. It lists all the Homebrew apps. Once installed, you get access to hundreds of apps and tools.
Conclusion
That’s it! You finally made it to the end.
Jailbreaking Nintendo Switch gives you complete freedom. You can install homebrew apps, run retro games and emulators, and even install streaming apps. If you’re feeling adventurous, you can also run Android (that’s a topic for another day).
Have fun!
In any case, you should also check out our guide to reset your Nintendo Switch. This is especially useful for emergencies!