Valorant is fun to play, but you often get frustrated with errors, isn’t it? The most common thing right now is Valorant not working on Windows 11, and I’m here to help you with it.
Valorant is an FPS game developed and published by Riot Games. The game had to face negligible errors on Windows 8 and Windows 10. However, this is different from the latest version of Microsoft’s operating system (Windows 11). At the same time, these errors are manageable and can be solved in minutes.
These errors include System Requirements, Administrative Rights, Environment Variables, Old Graphic Drivers, Riot processes overlapping, VGC not running, and the most prominent being TPM 2.0 and Secure Boot error. To overcome these errors on your machine, we have created a step-by-step guide for each error.
Below, you’ll find multiple errors concerning Valorant on Windows 11 and the reasons/solutions for the errors.
Minimum Requirements
Minimum Valorant requirements can be a critical factor affecting the game on your Windows 11 Machine. According to Riot Games, the minimum hardware requirement is to have a Core 2 Duo/ Athlon 200 GE paired up with Intel HD 4000 / Radeon R5200, respectively.
If your hardware doesn’t meet these minimum requirements, consider upgrading components or your machine entirely. You can also check the complete requirement list by heading to the official site of Valorant. However, if the issue persists, follow the next steps on the list.
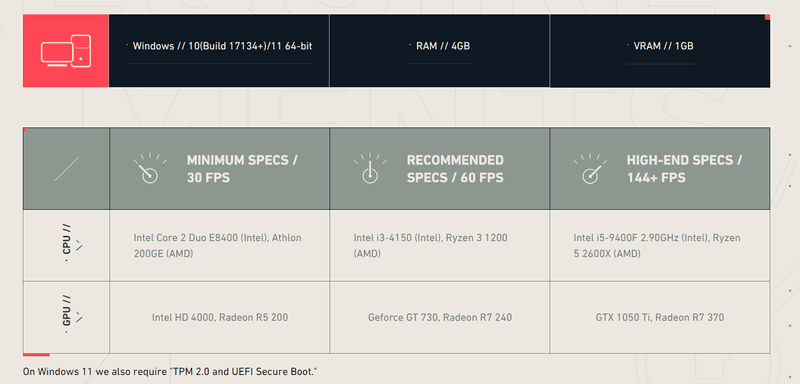
Note: If you are unaware of the hardware components, you can check it in the PC settings or use third-party tools that generate the overall report of your system.
Valorant with Administrative Rights
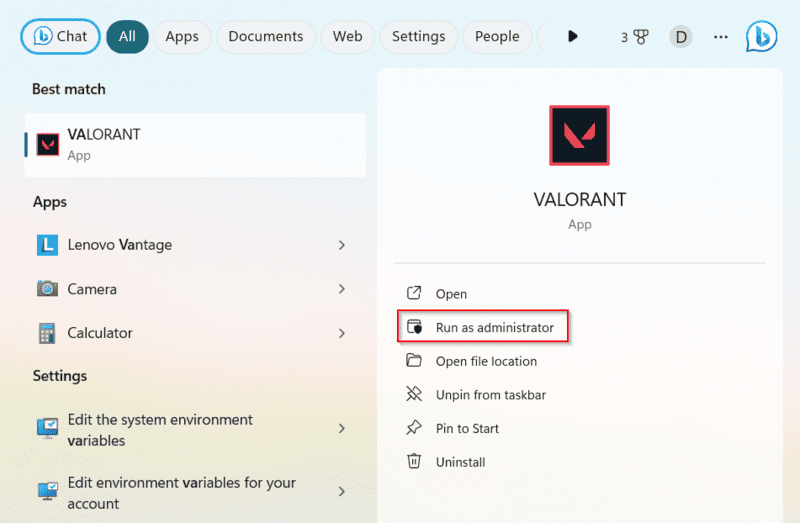
In a few cases, the game might encounter errors if you don’t have enough rights assigned to your user account. To resolve the issue, right-click on the Valorant launcher and click the “Run as Administrator” button. Click on ‘Allow‘ if any further rights are requested as a pop-up.
Environment Variables
Environment Variables are the dynamic variables with editable values used by individual programs or sets of programs. These variables are often known as objects, and they help programs identify the location to store program files, temporary files, and profile settings. Editing Environment Variables can help with the black screen error and a few other errors for Valorant on Windows 11.
- Type ‘RUN‘ in the Windows Search bar or press ‘Windows + R‘.
- In the RUN dialog box, type ‘sysdm.cpl‘.

- In the system properties, click on ‘Advanced‘.
- Under the ‘Advanced’ tab, click on ‘Environment Variables‘.

- On the ‘Environment Variables‘ menu, Click on ‘New‘.

- On the New User Variable pop-up, set the Variable name and Variable value as:
| Variable name | OPENSSL_ia32cap |
| Variable value | ~0x200000200000000 |
- Click ‘OK‘, and then click ‘Apply Changes‘ if required.
- Launch the game and enjoy.
Graphics Driver
One of the issues that players face is having improper or old graphic drivers. Players should regularly update the graphics driver associated with their GPU brand to resolve this issue. The two renowned Graphics brands are NVIDIA and AMD.
Steps to Upgrade Drivers❓
➡️ NVIDIA
- In Windows Search, type ‘GeForce Experience‘ and open the app.
- On the GeForce Experience app, click on the ‘Drivers‘ tab.
- Click on the ‘Download‘ button under the available drivers.
- Once the download is complete, choose the Mode of Installation depending on your preference and follow the instructions.
- Launch the game after a restart.
➡️ AMD
- In Windows Search, type AMD Radeon Software and open the app.
- On the AMD Radeon app, under the homepage, check the Drivers & Software.
- Click on the ‘Download‘ button under the available drivers.
- Once the download is complete, click on the ‘Install‘ button.
- Launch the game after a restart.
Background Riot Processes
The background processes pile up in the background, and due to these multiple processes, Valorant sometimes gets stuck in the loop and hangs on the Black Screen. To resolve this issue, you must kill all the Riot processes and re-launch the game.
Steps to Kill Riot Processes❓
- Right-click on the Taskbar and then click ‘Task Manager‘.

- Search for services like “Riot Client“, “Valorant.exe“, and any related services in the ‘Process’ tab.

- Right-click each one of them, and then click ‘End Task‘.
- Once everything is closed except Vanguard, re-launch Valorant.
- In case you kill the Vanguard services, you will be required to restart your machine.
Valorant in Compatibility Mode
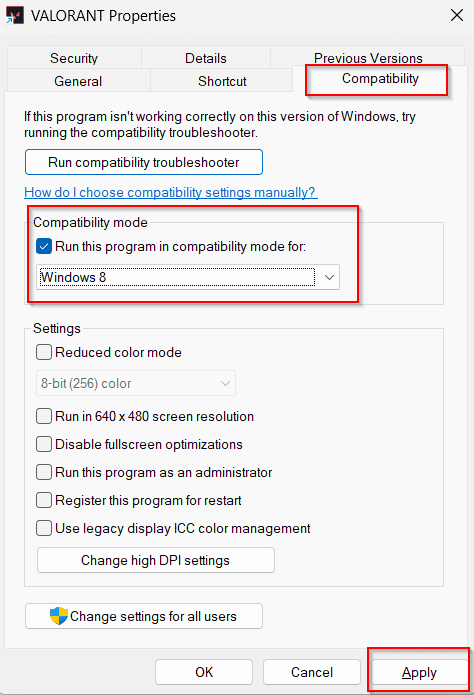
Valorant usually gets the black screen issue if the game settings are not compatible with your system settings. To resolve this issue, right-click on the Valorant launcher and then click on ‘Properties‘. Under Properties, click the ‘Compatibility‘ tab and then check the compatibility box. Select Windows 8 or 10 in the drop-down menu and click ‘Apply‘. Re-launch the game.
TPM 2.0 and Secure Boot Error
TPM 2.0 and Secure Boot are the most prominent errors when upgrading to Windows 11. Here, TPM stands for Trusted Platform Module, which contains information like digital certificate, keys, and passwords that keeps your PC secure. Secure boot is a Unified Extensible Firmware Interface, also known as UEFI. It protects the PC from vulnerabilities and threats that can cause severe damage to your machine.
Steps to resolve TPM 2.0 and Secure Boot Error❓
➡️ TPM 2.0
- Restart your machine.
- Keep hitting the dedicated BIOS key on the logo flash; the key bind depends on your machine brand.
- Search for ‘TPM‘ or ‘Trusted Platform Module in the BIOS settings‘.
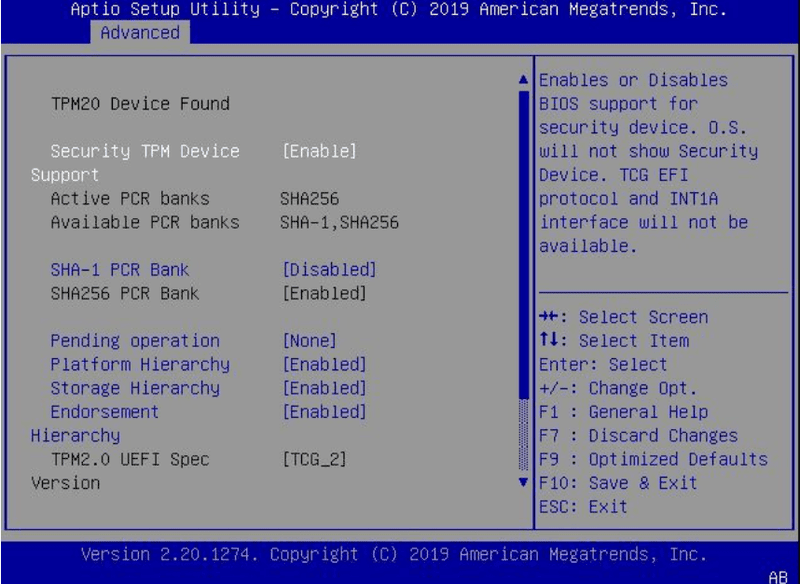
- Under the TPM menu, tick the ‘Enable‘ button.
- Save the settings and exit the BIOS settings.
- Launch the game.
➡️ Secure Boot
- Restart your machine.
- Keep hitting the dedicated BIOS key on the logo flash; the key bind depends on your machine brand.
- In the BIOS settings, search for ‘Secure Boot‘.

- Under the Secure Boot menu, tick the ‘Enable‘ button.
- If you have CSM support on your system, you will need to disable that, and then you can enable Secure Boot.
- Launch the game.
➡️ Status Check
- In Windows Search, search for ‘System Information‘ and open the app.

- Under the system summary, look or search for the ‘BIOS Mode‘ and ‘Secure Boot‘.
- BIOS mode should be ‘UEFI‘, and Secure Boot should be ON.


- For TPM, search Device Manager in Windows Search and open the app.
- Expand ‘Security Devices‘, right-click on ‘Trusted Platform Module 2.0‘, and click on ‘Properties‘.

- Under the ‘Details‘ tab, check for Device Description. Look for ‘is present‘ and ‘is connected‘. It should be Trusted Platform Module 2.0, ‘true‘ and ‘true‘, respectively.


VGC Service Status
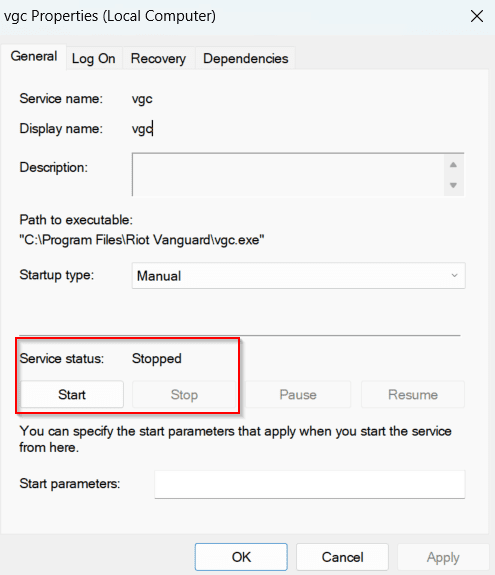
VGC is the base of the Riot Vanguard services; it is the anti-cheat for Valorant. In case the VGC is not running, the Vanguard won’t be able to verify your game on the machine and won’t let you in the game. To resolve this error, check the VGC services first and start the services in case the service is not running.
Steps to Start VGC services❓
- Type ‘RUN‘ in the Windows Search bar or press ‘Windows + R‘.
- In the RUN dialog box, type ‘services.msc‘.

- Look for ‘VGC‘ in the ‘Services‘ tab.

- If the service is not running, right-click on the service and then click on ‘Properties‘.
- In Properties, click on ‘Start‘.
- Re-launch the game.
Conclusion
Valorant is growing immensely among casual and competitive players due to the game’s dynamic nature. Its wide range of agents and unique abilities make the game stand out from all the games in the market. However, with the launch of Windows 11, players are facing a few errors in running the game. The above step-by-step guide will allow you to resolve most of the errors you face while launching Valorant.
Once you’ve got your game up and running again on Windows 11, check out the best Valorant weapon skins to customize your loadout!

