Almost every game today has a slider or a drop-down menu where you can select different graphics settings to choose between quality and performance. However, you can also manually adjust these settings, and this might be better if you know exactly what to tweak.
Some options only offer slight improvement but put too much pressure on PC resources. Similarly, there are some that only slightly impact the resources but offer a noticeable difference in quality. There are even some options that could give you a competitive disadvantage if you aren’t careful.
To help you optimally adjust graphic settings, I have listed some important in-game graphics options, and I’ll explain what each of these graphics options does and how to optimally tweak them.
Resolution
This is usually at the top of every graphics setting interface, and almost every game has it. Resolution is the total number of pixels displayed horizontally and vertically on your screen, such as 1920×1080 (FHD) or 3840 x 2160 (UHD). The higher the resolution, the more the images will be clear and detailed. A lower resolution than the screen’s native resolution will lead to more pixelated and blurry images.

Since higher resolution means the device has to render more pixels, it also means more load on system resources. Similarly, a lower resolution will have a lower impact on the system resources.
➡️ How to Optimally Adjust?
The rule of thumb is to set the in-game resolution the same as the maximum supported resolution of your monitor. Most games will have the word “recommended” next to it.
If you are having trouble running a game at optimal FPS, then a lower resolution can significantly boost FPS. Of course, this means the graphics won’t be as crisp anymore, and in many games, you’ll have field-of-view issues, so you’ll see less.
Frames-Per-Second (FPS)
This is the total number of individual frames (images) shown per second. In gaming, 60 FPS is considered ideal for smooth gaming, and this is the minimum you should aim to achieve. Although for fast-paced games like shooters, gamers might prefer 144 FPS or even 240 FPS to be competitive.

FPS is limited by device resources, monitor refresh rate, and human eye’s limitations. The higher the FPS, the more your PC will have to work hard to deliver those frames. Even if your device is good enough to deliver high FPS, it is still limited by the monitor’s refresh rate, as standard monitors run at 60Hz.
Rightly so, the human eye, on average, can notice a difference up to 60 FPS, so going above is usually not necessary. Of course, for the best gaming experience, the higher the FPS; the better.
➡️ How to Optimally Adjust?
Assuming your PC can handle the game and offer high FPS, then limiting it to your monitor’s refresh rate is the most optimal since any higher FPS is getting wasted as the monitor doesn’t deliver it.
Although, you don’t need higher than 60 FPS for most games, including reaction-based games like MOBAs or RPGs. Setting it to 60 FPS will be best for most people to put less pressure on system resources and avoid overheating, especially if you want to optimize gaming on a laptop.
Vsync
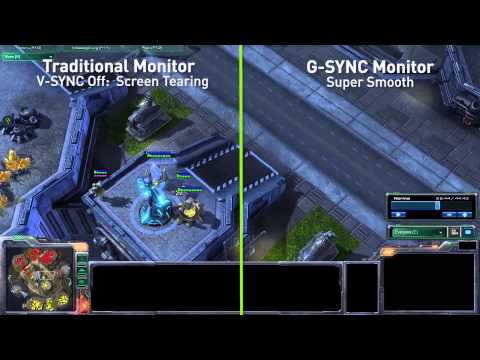
Vsync (Vertical Sync) is all about synchronizing game FPS with your monitor’s refresh rate to ensure no screen tearing happens. Often when the GPU is capable of producing higher FPS than your monitor’s refresh rate, screen tearing can happen, which Vsync helps avoid.
Not only does it prevents screen tearing, but it also lowers the load on the GPU as GPU doesn’t have to run at max power. However, turning on Vsync can also introduce input lag due to the way it handles the synchronizing process.
While Vsync is enabled, the GPU tries to keep up with the monitor’s refresh rate by buffering a frame alongside the monitor’s refresh cycle until the monitor reaches its limit. This helps keep both in sync and avoid screen tearing. Unfortunately, to keep up with the monitor’s refresh rate, the GPU waits for the monitor’s refresh cycle to finish before rendering each frame. This wait causes a slight input lag.
So enabling Vync does have its benefits, but it could also introduce input lag. Manufacturers have attempted to solve or at least minimize this problem with options like adaptive sync, G-Sync, and FreeSync.
➡️ Adaptive Sync
Adaptive Sync is an advanced Vsync option where the game enables or disables Vsync in real-time based on FPS and monitor refresh rate. If GPU can produce more frames than the monitor refresh rate, then it will enable Vsync to avoid screen tearing. On the other hand, if GPU can’t provide enough FPS to go above the monitor’s refresh rate, then Vsync will be automatically disabled to avoid input lag issues.
This option is especially useful in games where your GPU can produce FPS near the monitor refresh rate, and it constantly goes above or below it while playing the game. It’s also useful for games with certain heavy gameplay activities, like large group fights.
➡️ G-Sync or FreeSync
G-Sync and FreeSync are hardware-based solutions by NVIDIA and AMD, respectively. For G-Sync, there’s dependency on a G-Sync module added to the monitor to adapt the monitor’s refresh rate to the GPU’s frame rate output. FreeSync also does the same thing, but it depends on DisplayPort support instead.
Both G-Sync and FreeSync avoid input lag while still limiting FPS to prevent screen tearing.
➡️ How to Optimally Adjust?
If you have support for Adaptive Sync, G-Sync, or FreeSync, then it’s best to enable them. Otherwise, you should enable Vsync when you are facing screen tearing or if you don’t want to put unnecessary pressure on the GPU.
However, while playing a competitive game where input lag matters, it’s best to keep Vsync or Adaptive Sync disabled. For a 60Hz monitor, the input lag is 16.67ms (1000/60), and it’s further increased based on how much FPS your GPU can produce (1000/GPU output).
Anti-aliasing
In game designing, it’s impossible to avoid jagged edges due to the way straight lines and curves are drawn and presented as pixels on a screen. Anti-aliasing uses different methods to create an illusion of smooth edges to offer a more realistic experience.
The methods used include FXAA, SMAA, MSAA, and TAA. Each method has its benefits and impact on the game’s performance. Some games will list these methods, and some just list low, medium, or high options that use these methods in different combinations. Below is a simple explanation of each.
➡️ FXAA
Fast Approximate Anti-Aliasing (FXAA) basically applies a smoothing filter to an image already rendered to make it look smooth. The filter just blends nearby colors, so it’s just a quick and dirty way for image improvement. However, this method has the least impact on performance.
➡️ SMAA
Subpixel Morphological Anti-Aliasing (SMAA) uses a similar technique to FXAA, but it’s more precise. It uses an algorithm to understand different patterns and edges in the image and then applies a more precise filter based on the gathered information. When finding the best balance between quality and performance, SMAA is the preferred choice.
➡️ MSAA
Multisample Anti-Aliasing (MSAA), as the name suggests, takes multiple samples from an image and combines them to create a smoother image. Usually, it will have 2x, 4x, and 8x options that decide how many samples are taken for better quality. It’s heavy on GPU though, especially if you choose 8x.
➡️ TAA
Similar to MSAA, Temporal Anti-Aliasing (TAA) also takes samples, but it takes them from multiple frames instead of just one and then blends them. Not only does it smoothes edges, but it also removes flickering effects during fast movements. It’s also quite heavy on the GPU.
➡️ How to Optimally Adjust?
It solely depends on your preference whether you want more smooth frames or better performance. Compared to what it offers, it’s very heavy on resources. Enabling it can easily decrease 10-30 FPS in most games. Personally, if I am min-maxing graphics quality and performance, I always prioritize increasing in-game graphics quality over anti-aliasing.
Tessellation
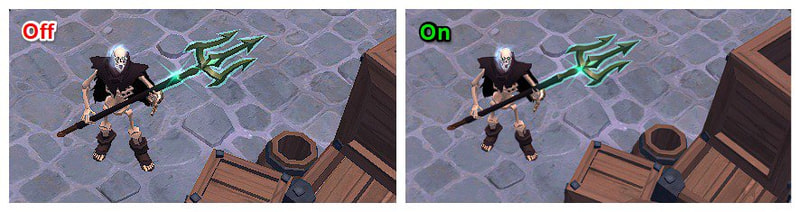
Tessellation breaks complex polygons in 3D models and surfaces into smaller and finer triangles to make them more detailed and realistic. In computer graphics, triangles are the simplest shape to work with. Breaking complex polygons into smaller triangles creates a better opportunity to give improved geometric details to objects.

Once enabled, you’ll notice objects and surfaces being more round and detailed. The option usually has sub-options to define how many triangles it creates from each polygon, including low, medium, and high. Of course, this process is quite heavy on GPU, and enabling it will have a medium to high impact on performance based on your GPU.
➡️ How to Optimally Adjust?
Enabling this may not give you a competitive edge, but its impact on image quality is very prominent, especially on objects up close. If the GPU can handle it, definitely enable this option.
Texture Quality
Game developers usually create games with different types of textures to cater to different hardware. Usually, there are low, medium, high, and ultra-texture qualities. In low textures, the images and models are of lower resolution with simple details. High textures have better resolution and are more detailed and realistic.
All these textures are inside the game files on your storage drive and are used depending on the Texture Quality option. If you increase texture quality, the game will put the higher quality textures from the storage into GPU memory which affects both GPU memory and processing power.

This is different from anti-aliasing or Tessellation, which apply improvements in real-time. It affects the overall quality of the game. Other graphics option apply their improvements to the selected texture quality.
➡️ How to Optimally Adjust?
You must experiment with what quality works best for you since it also affects other improvements. It will have a noticeable impact on your GPU, and the frame rates will drop if you’ll choose the high or ultra option. For most games I have played, I personally never noticed too much difference between high and ultra options, but the performance drop was there. Medium or high works best for me in most cases.
Shadow Quality
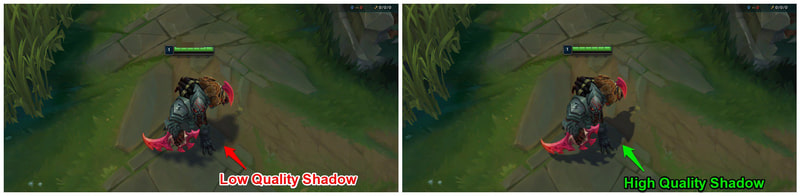
It might not look very important, but it heavily impacts your device resources, so it’s worth considering when finding quality and performance balance. Shadow Quality, as the name suggests, improves the quality of shadows cast by characters and objects.
At higher levels, it makes the shadows more smooth and realistic while considering how light interacts with objects. Better quality, along with the need to trace shadows of moving objects and characters, can be very resource intensive.
Most games also have other shadow-related options like shadow resolution, shadow filtering, dynamic shadows, etc. All of these options directly impact the shadows in the game. Ambient Occlusion is another related option that affects the light’s interaction with objects close to each other and makes it look real by adding soft shadows between them.
➡️ How to Optimally Adjust?
If I ever have trouble with game performance, the first thing I do is completely turn off shadows, as they aren’t very important for gameplay. Usually, this provides a big increase in FPS. Although, if you are looking for a more realistic gameplay experience, shadows are a must, and you should experiment with different qualities.
High Dynamic Range Rendering (HDRR)
In most games, this option can be simply enabled or disabled with no sub-options. Its main purpose is to enhance the colors and brightness shown on the screen to create a better contrast between dark and light areas.
In both environments, it shows better details of the scene for a more realistic experience. Furthermore, it can also give a competitive advantage as it makes it easier to see things in dark and bright environments.
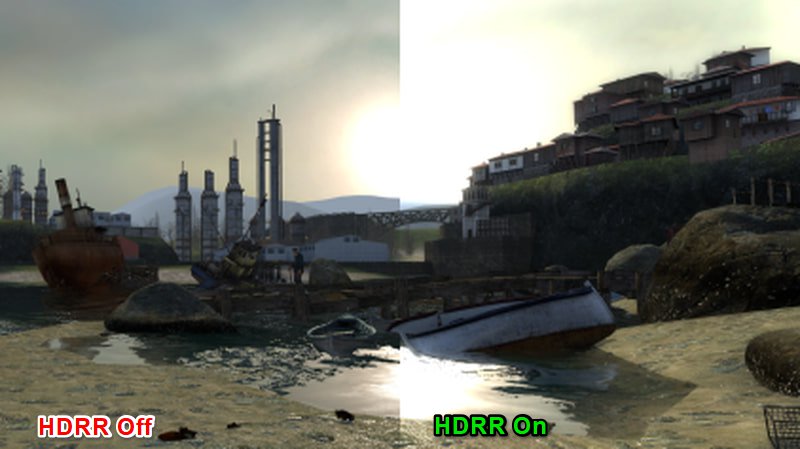
It will impact performance slightly since it is still an additional process. However, most newer GPUs are specially optimized to allow HDRR gameplay.
➡️ How to Optimally Adjust?
If your PC can handle it, enable it. There is usually no downside to it, and a better view of things is always better.
Deep Learning Super Sampling (DLSS)
Although this feature is currently limited to Nvidia RTX series GPUs, it’s worth knowing if you have one or you are looking to upgrade. DLSS is both a performance and visual improvement graphics option that uses AI learning to understand images and then upscale lower-resolution images to higher resolution in real-time.
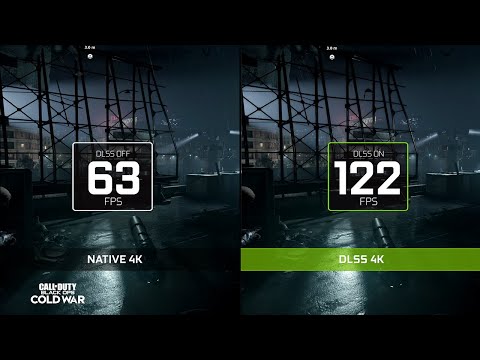
It doesn’t force the GPU to render the high-resolution image; the GPU renders the low resolution, and DLSS converts it to a higher resolution without putting much pressure on the GPU. For example, your GPU can render a 1080p game, and DLSS can convert it to 4K resolution. This offers both better performance and image quality.
➡️ How to Optimally Adjust?
Practically, there is no difference between a GPU-rendered resolution and a DLSS-upscaled resolution. You should definitely enable it to get the best experience and lower load on GPU too. Many games only have an on/off option for it, but some also offer additional options like Performance, Quality, Balanced, etc.
Ending Words
Although there are many in-game graphics options that could make your experience better, the above are the most impactful ones and are supported in most games too. Adjusting them will directly impact how your game will run. Whether you are looking for better visuals or trying to squeeze out some extra FPS, you should tweak these options first.
Next, check out our tips to optimize gaming audio and gain that competitive edge.